

How To Repair Dripping Shower Faucet, Delta
How Do You Prepare a Leaky Delta Single Handle Shower Faucet?
Delta shower faucets are some of the most reliable and long-lasting in the industry. Simply they don't concluding forever. At some point in their life they volition start to leak.
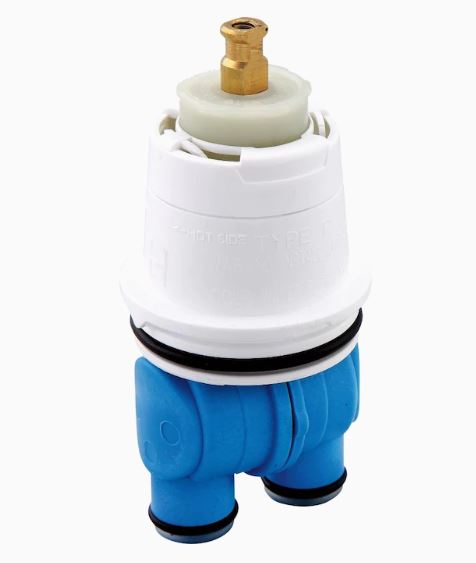
A dripping/leaking Delta shower faucet is nigh always acquired by a faulty cartridge. This is usually due to worn out cartridge seats and springs, mineral deposits/droppings or worn out O-rings. Replacing the entire cartridge or the seats and springs will fix the trouble.
It is of import to know the blazon of Delta shower faucet and cartridge you lot have earlier starting the repair. Delta has different types of cartridges that are non interchangeable so you lot need to know your cartridge's model number and order an exact replacement.
To know what type of Delta faucet cartridge yous have, compare it with the ones on the Shower Cartridge Identifier on their website. Alternatively, you tin take your old cartridge to the nearest domicile improvement store and buy an exact replacement.
Your Delta shower faucet model tin can be establish on the packaging that came with the faucet. If you cannot trace the packaging, use the Delta website to compare information technology with the images there.
The good thing is that Delta shower cartridges have a lifetime warranty. If you are the original heir-apparent of the faucet, contact their customer care with the part number of the old cartridge and they will transport a replacement kit for you free of charge.
Although replacing the shower cartridge seats and springs will most likely stop a leaking Delta shower faucet, I unremarkably recommend replacing the unabridged cartridge. That way you will accept the peace of heed that the faucet will non leak for the next several years.
Replacing a shower faucet cartridge sounds like a really hard chore just information technology isn't and you don't demand to hire a plumber to exercise it. Any homeowner can do it in about 15 minutes or less.
How to Fix a Dripping Delta Shower Faucet
To set a dripping shower faucet you will need the following:
- Cartridge replacement kit
- Philips screwdriver/ gear up of Allen wrenches
- Strap wrench/pliers
- flathead screwdriver
- plumber'due south grease
One time you have the items in place, follow the steps below to supersede the cartridge:
1. Turn off Water to Your Shower
Y'all cannot replace a shower cartridge with h2o already flowing in the pipes. Those who have attempted it have a story to tell.
Unlike other fixtures in your house, a shower faucet is the but i without a carve up shut off valve. You will therefore need to plough off the entire water supply to your business firm.
Some houses have a shower admission console on the wall backside the shower faucet. If you encounter this access panel in your house, remove it to reveal shut off valves for both cold and hot water lines to the shower faucet.
If y'all accept no access panel, nuance to the basement or wherever your main h2o shut off valve is and turn off water to the house. Turn on the shower faucet to drain the water already in the pipes.
Afterwards draining the lines, plug off the shower or bathtub drain to prevent dropping anything down the drain. You will as well desire to brand sure that the tub or shower flooring is dry out to forbid slipping and falling.
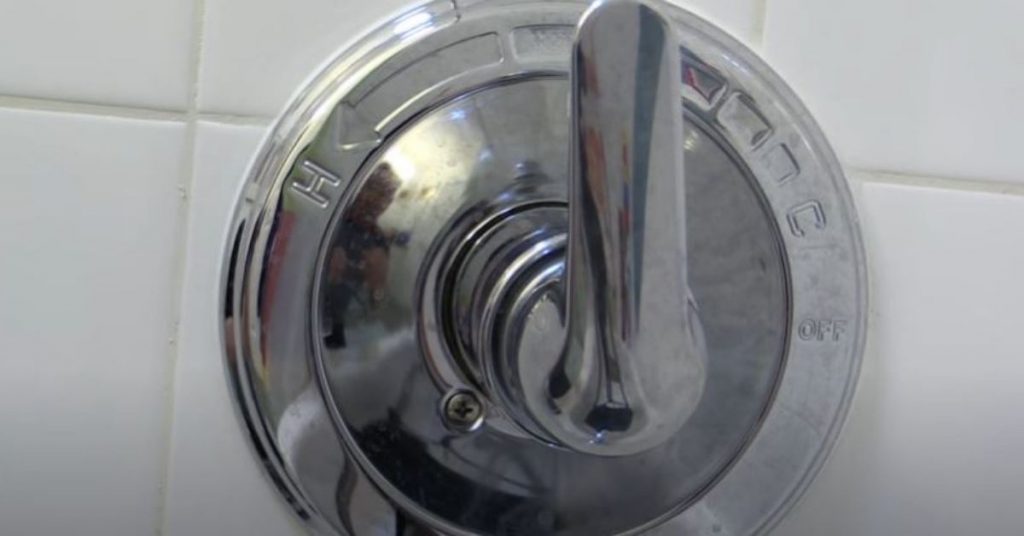
2. Remove the Faucet Handle
A Delta shower faucet volition have either a lever or a knob for a handle. Removing any of them is withal very piece of cake.
- If yous have a lever-type handle, plough it upside down to reveal a hex screw underneath it.
- Use an Allen wrench to remove the screw.
- Grab the lever and pull it out equally you lot wiggle it at the same time.
- If you have a knob-type handle, it will be continued to the cartridge by a Philips screw. The screw is usually hidden by an index cap at the forepart.
- Pry off the index cap with a flathead screwdriver or knife.

- Use the Philips screwdriver to remove the screw.
- Remove the handle by pulling information technology out and wiggling it at the same fourth dimension. It may not come off hands if it has been in place for a long time due to corrosion.
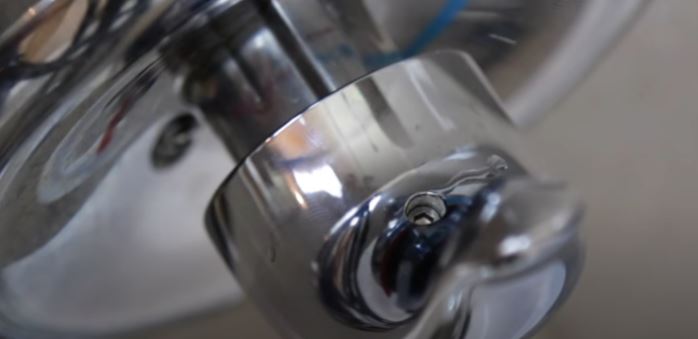
3. Remove the Cartridge
- Remove the trim sleeve. This is the circular slice between the handle and the cartridge. It is normally not threaded so you only demand to slide information technology out. Yous will see a spacer when yous look inside the trim sleeve. Put the sleeve aside.
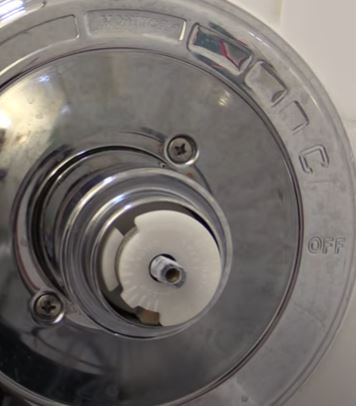
- Remove the cartridge ring. A cartridge ring holds the cartridge tightly in place. Before using a wrench to try and remove it, I recommend that you lot first check if it is only mitt tight.
- If the cartridge ring is quite tight, a strap wrench is the recommended tool for removing it. You lot can however use an adjustable wrench or pliers. Be gentle on this piece as you do non want to oval it.
- In one case the band is loose, unscrew information technology with your hand and place it bated likewise.
- With the ring out, the cartridge is now free. Grab it with your hand and pull information technology straight out. You may need to wiggle it a little as you pull it out. Likewise, note that some h2o will come out once you pull out the cartridge.
Once the cartridge is out, inspect it for whatever damages and try to find out why it was leaking in the kickoff identify. Although my recommendation is that you lot replace the cartridge, you can opt to only supervene upon the seat and springs only. Bank check out this You Tube video if yous need to supplant the seats and springs.
4. Clean the Shower Valve Body
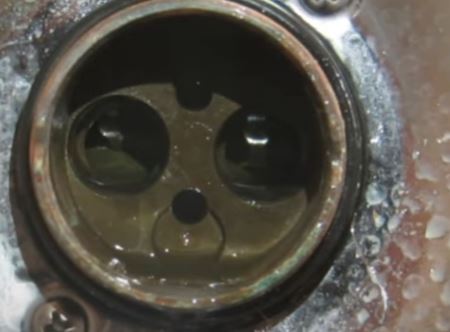
Grab a flashlight and inspect the inside of the shower valve trunk. Check if at that place is corrosion, mineral deposits or just whatsoever form of debris that will forestall you new cartridge from working properly.
Information technology is not unusual for a shower faucet to leak even after replacing the cartridge.
Clean out all the corrosion and mineral deposits from the within of the valve body. Some people even turn on the water for a few seconds to flush the pipes which prevent the new cartridge from existence plugged past debris.
5. Install the new Cartridge
- Apply grease on the new cartridge's O-rings. This helps information technology to seal effectively and also easy to pull out the next time y'all will be replacing it.
- Bank check the cartridge'due south orientation. In that location will be 'hot' and 'common cold' markings on the cartridge. It is important to ensure that as you install the cartridge, the side marked 'hot' is on the left while the one marked 'common cold' is on the right.
- Gently button the cartridge within the valve body.
- Delight non that at that place are 2 indentations on the valve trunk that should friction match with 2 shoulders on the cartridge. These 2 should coincide as a confirmation that the cartridge is properly installed.
- Screw in the cartridge ring. You lot practice not need to tighten the ring with a wrench. Hand tight is perfect.
- Slide in the trim sleeve. Again, practise not forget which side goes in first. The side that goes in beginning is the side with the spacer and is besides wider.
- Adjust the anti-scald device. This is the plastic piece at the tip of the cartridge. Pull it and turn it to the left for hotter or correct for colder water. Once y'all have adjusted it don't forget to push it in.
6. Install the Handle
Install the faucet handle dorsum pretty much the same manner yous removed it.
In one case you lot have connected the handle back plow on the water and examination your new shower faucet. If indeed a faulty cartridge was the trouble, yous will find that the dripping will stop.
Every bit I had mentioned before, some faucets will continue leaking even afterward replacing a cartridge. If unfortunately that happens to you lot, the shower valve may exist damaged and would demand a replacement.
Replacing a shower valve is expensive since information technology will also require hiring a licensed plumber.
If y'all would like to follow all the above steps from a video by Delta, here is one for you.

Source: https://plumbingsniper.com/leaky-delta-shower-faucet/
Posted by: blakelivelyins.blogspot.com
0 Response to "How To Repair Dripping Shower Faucet, Delta"
Post a Comment