

How To Repair Cracked Bricks
Synopsis: Bricks and mortar crevice with time. In this article, veteran bricklayer John Carroll delves into the tools and techniques for repairing damaged brick masonry, including how to match the colors of new cloth to old, the blazon of mortar to apply, and how to repair a brick without replacing it.
Editor's note: This article was written before OSHA released their guideline about the dangers of breathing in silica dust when cut or grinding masonry. Be sure to protect yourself, your coworkers, and your clients if you have on a projection similar this.
There are a lot of reasons people choose brick for a building material. It doesn't provide an endless buffet for termites or serve as a edifice site for carpenter ants. Woodpeckers exercise not delight in drilling holes in information technology. It'southward dimensionally stable, doesn't rot or burn, and never needs to be painted. With all these things going for information technology, though, brick has an Achilles heel: It's hard and inflexible, and information technology cracks nether sure conditions.
Whether the cracks are caused past movement, insufficiently filled joints, or merely too many decades of beingness exposed to the weather, the owners of brick houses in Durham, Northward.C., often call me to fix them. The reason they telephone call me is because I do more than slop mortar into the cracks. I make an try to lucifer the color of the existing mortar, and when bricks are croaky, I repair the cracks with mortar dyed to match the color of the bricks. I also prep the surface properly, utilize the right mortar, and proceed the joints as peachy as possible. After packing the joints with mortar, I tool them to match the profile of the joints on the rest of the wall. My goal is always to make the cracks disappear.
Why brick cracks
Masonry structures crack for several reasons. The first is considering the ground or slab the masonry rests on moves. (Many older houses don't even have what we'd consider footings today; the structural brick wall rests directly on the soil.) The beginning building material is non the footing but the soil that it bears on. Footings should be placed on virgin soil or soil that has been mechanically compacted to reach the proper bearing capacity.
Water tin cause some otherwise audio soils to go soft and plastic, reducing their bearing capacity and resulting in differential settlement that cracks the ground. Saturated soil that freezes tin can push sections of a footing upwards, or it can push laterally on a below-grade masonry wall. Another problem is that structures such as foundation walls and retaining walls are oftentimes underbuilt. Masonry that's subjected to potent lateral forces, such every bit those imposed by soil, should be reinforced with steel.
A well-planned arrangement to drain water away from the foundation is essential. But the work of even the most careful builder can be undone afterward by changes to the grade effectually the business firm. Landscaping that piles upwardly mulch and clay a few feet from the house often holds water that soaks in and eventually causes cracks in footings and concrete slabs.
Steel lintels support brick as it passes over windows and doors. Steel that is too small for the span can deflect, causing cracks in the masonry above. In addition to sizing lintels correctly, it'southward important that they bear upon the brick at each side of the opening and not be attached to the wood framing behind. Woods expands and contracts more than masonry. Fastening the lintel to the framing tin cause cracks in the bricks.
Rusting lintels also can damage bricks. Steel expands every bit it rusts, lifting the masonry. The stair-shaped cracks that sew and away from the top corners of door and win dow openings are usually caused by this rust. The all-time mode to avert them is, one time over again, to manage the h2o. Lintels should be flashed carefully to proceed them dry and to shed whatsoever water that gets behind the brick veneer.
Cracks are also caused by poor workman transport. Over the long haul, joints that are packed solid with mortar perform a lot bet ter when exposed to the elements than joints that have voids nether the surface. Although builders should have the steps described here to minimize movement in masonry struc tures, movement tin't exist eliminated com pletely. At least some motion is inevitable, so repairs will go necessary eventually.
Sizing upwards the job
When people call me to repair brickwork, my offset job is to look closely at the area in question and make up one's mind whether the work is going to be cost-constructive or even feasible. In full general, I encounter three types of problems. The outset is old mortar that's loose in spots and has some visible fissures and voids. In these cases, all that's needed is to grind out the mortar and repoint the joints.
The second type of problem occurs when the brickwork has moved and created cracks, some of which run through the bricks. In this case, the homeowner has to brand a dif ficult decision. The simply way to ensure that the brickwork won't crack once more is to address the cause of the movement. Since this often involves replacing a lintel, or fifty-fifty repairing a footing, addressing the root cause can be very expensive. On the other paw, information technology may exist reasonable to assume that a firm that has been sitting in the aforementioned spot for fifty or more years has done all the settling it's going to do. Managing the water around the foundation may exist enough to terminate any further progress of the underlying cause, and simply repairing the masonry becomes acceptable. I've made many repairs in such cases that take held up well for over a decade.
The third type of problem is when the masonry is falling apart and can't exist repaired. A common example is brick stairs that were built without a concrete basis. No amount of repointing tin repair these aging structures, and I advise the homeowners that the best solution is to tear the whole thing out, dig and pour a proper ground, and build a new set of stairs. Brickwork on houses themselves rarely reaches this state because information technology'south normally repaired before and so.
I frequently encounter poorly washed repairs. The mortar is oftentimes the wrong type and the wrong color. It's smeared on the face of the bricks and finished in a manner that doesn't come shut to matching the joints on the remainder of house. Cracks that run through bricks are simply filled with gray mortar. The repaired cracks might keep water out, but they are an eyesore. I often end upwardly redoing these botched fixes as I work my way around the house repairing other cracks.
U se the right mortar
Mortar should exist softer than the bricks so that small stresses are absorbed by the mor tar rather than dissentious the bricks. Earlier the tardily 19th century, mortar was very soft, consisting of lime and sand, and worked well with the soft bricks of the time. Beginning in the belatedly 19th century, improved kilns and manufacturing techniques created harder bricks, and portland cement became com monly available. Modern mortar always contains portland cement and sand, which sets up harder than direct lime mortars. To improve workability and soften the mortar, masons add hydrated lime to the portland cement. In the 1920s, masonry cement came on the market. Masonry cement contains portland cement but uses proprietary ingre dients in place of site-added lime.
Varying the ratio of portland cement and lime (or the proprietary ingredients in masonry cement) to the sand yields dissimilar classifications of mortar with different com pressive strengths. Both portland-cement/ lime mortar and masonry-cement mortar are classified in three types: M, Southward, and N, with Type M existence the hardest and Type N the softest. An fifty-fifty softer mortar, Blazon O, is not available as a masonry-cement mortar and tin can be fabricated only by mixing portland cement and lime. To repair cracks in brick walls, Type Northward is considered ideal for about buildings congenital afterward 1900. For historic buildings with soft bricks, Type O or lime mortar without portland cement is unremarkably specified.
Type Thou, Type South, and straight portland-cement mortar with no lime shouldn't be used to repair cracks in brick walls. They are hard and inflexible, adhering to the bricks so tenaciously that the slightest movement tin cause the bricks to split and spall.
Clean out the old mortar
The commencement step in repairing a crack is to grind out the old mortar. Joints should be ground to a depth that's twice their width (usually 3⁄4 in. to ane in.). The tools I utilise depend on the hardness of the mortar and the bricks likewise as the overall integrity of the wall. Old bricks tin be fragile, and I work according to the maxim "First, do no harm." Mortar never comes out consistently. In the form of grinding and chiseling, the mortar further back in the articulation often breaks and crumbles. That's not a problem; I only fill the deeper space with mortar during the side by side stage of the job, actually getting a better repair in those areas.
 |  |
 |  |

Make the mud to friction match
A common error is mismatching the mortar color. Achieving a perfect match is hard; sometime mortar can display a range of shades, and sometimes it was dyed. Prior to the 1960s, portland-cement/lime mortars prevailed and tended to be lite tan in color. Masonry- cement mortars have gained popularity since then and are generally gray but also come in white, tan, and buff. Y'all can go a skilful lucifer by making samples using mixes from different manufacturers and letting them harden for a week or so; mortar lightens as it dries. When standard materials don't friction match, I bring a
chunk of the mortar to Custom Match Colors (custom matchcorp.com), a local company with scores of powdered mortar dyes. If I get close to the existing color, then fourth dimension, dust, pollen, and algae make small differences disappear.
 |  |
 |  |
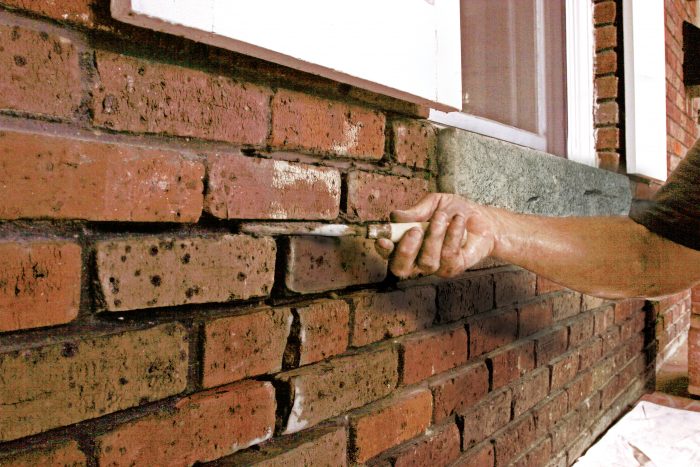
Fill the joints
To transfer the mud from the hawk to the wall, I use tuck pointers in several widths ( 1⁄4 in., iii⁄viii in., 1⁄2 in., 5⁄8 in., and 3⁄4 in.), choosing the widest that will fit in the articulation I'k filling. When possible, I piece of work directly from the hawk. But sometimes there are obstructions such equally sills, or it's besides close to the ground to concur the militarist, so I transfer the mud on the constrict pointer. I utilise the mud in layers and allow each to set upwardly a bit earlier applying the next. I continue until the joints are packed full.
For carrying the mortar to the articulation, I apply the tuck pointer to cut a 1⁄2 -in. strip of mortar on the hawk. I make a long motion of pulling the mortar along the surface of the hawk. This adheres the mortar to the tuck arrow so that I can carry it to the joint without dropping it. I go along a 4-in. brick trowel handy for patting down and shaping the mortar on the hawk; this helps continue the pancake of mortar together and at the correct thickness.


Finish the joints
It'south as important to match the contour of the repaired joints with those on the rest of business firm as information technology is to lucifer the color. Mortar joints tin can exist finished in several means. To showtime, after setting up slightly, joints can merely be cut flush with the face of the bricks and then brushed with a soft brush to texture them and blend them into the edges of the bricks. They as well tin be raked dorsum about 1⁄4 in. from the surface. The articulation raker is a special tool for this that helps to maintain a consistent joint depth, but you lot likewise can rake out the joint with a tuck arrow.
 |  |
 |  |
Finishing options. A third way to finish joints is by using a jointing tool to shape the mortar. In that location are many different jointing tools that can mold joints to a multifariousness of profiles, including concave, V-articulation, weathered, beaded, and grapevine.

Patching cracks in bricks
When a crack runs through a brick, many people think the solution is replacement. There are ii problems with that, the first being finding a replacement brick. Even if a brick with the same pattern were available, the existing ones have weathered, and so a colour match would be unlikely. The second problem is that removing an entire brick is invasive; especially on an older wall, i brick can pb to another and then to another. Instead, I make full cracked bricks with mortar dyed to match.
To make staining the mortar joints less likely, I wait until the mean solar day afterward repairing the joints to fill up any cracks in the
bricks. It's difficult to become an exact colour match. There are often several shades and colors of bricks in the same wall, and in many cases, individual bricks are mottled with different shades and colors. Even if I don't friction match the colour of each brick perfectly, using a colour that matches some bricks in the wall goes a long way toward making the fissure disappear and maintaining the bond pattern on the wall.


For more photos and details, click the View PDF button below:
This article appears in Fine Homebuilding issue #258 titled "Brick Fixes"

Source: https://www.finehomebuilding.com/project-guides/siding-exterior-trim/brick-fixes
Posted by: blakelivelyins.blogspot.com
0 Response to "How To Repair Cracked Bricks"
Post a Comment